
배움 저장소
[홍정모의 따라하며 배우는 C++] 7. 함수 본문
7.1 매개변수와 실인자의 구분(Parameter and Argument)
7.2 값에 의한 전달
Passing Arguments by value(Call by value)
Call by value는 값을 복사하여 전달한다.
- 아래 예제에서, main의 지역변수인 Argument 값이 복사되어 function에게 전달된다. function이 호출되면 함수의 Parameter에 복사된 값이 할당되어 초기화된다.
int function(int Parameter)
{
    return Parameter + 5;
}

int main()
{
    int Argument = 1;
    function(Argument);
}
7.3 참조에 의한 인수 전달
Passing Arguments by Reference(Call by Reference)
Call by reference는 값의 주소를 전달한다
- C++에서 함수는 여러 값을 반환할 수 없다. Call by reference를 이용하여 함수 내부에서 외부 값을 바꿀 수 있다.
#include <iostream>
#include <cmath>
using namespace std;
void getSinCos(const double °rees, double& sin_out, double& cos_out)
{
static const double pi = 3.141592; // bring it to header if you have
const double radians = degrees * pi / 180.0;
//static const double pi = 3.141592 / 180.0; // calculated once, faster than above
//const double radians = degrees * pi;
sin_out = std::sin(radians);
cos_out = std::cos(radians);
}
int main()
{
double sin(0.0);
double cos(0.0);
getSinCos(30.0, sin, cos);
cout << sin << " " << cos << endl;
}
Call by Reference 포인터 전달하기
- int*& ptr은 포인터 참조자로 해당 포인터의 별명을 만든다.
void func(int*& ptr)
{
    cout << &ptr << " " << ptr << endl;
}
int main()
{
    int x = 5;
    int* ptr = &x;
    cout << &ptr << " " << ptr << endl;
    func(ptr);
}
008FF848 008FF854
008FF848 008FF854
typedef를 사용하여 int*를 자료형으로 만들면 더 이해하기 쉽다
- 2중 포인터 3중 포인터를 사용할 때 유용하다.
#include <iostream>
using namespace std;

typedef int* pint;
void function(pint &ptr)
{
    cout << *ptr;
}
int main()
{
    int x = 5;
    pint ptr = &x;
    function(ptr);
}
Call by reference 정적 Array
- 함수의 매개변수로 정적 배열은 잘 사용하지 않는다. 이유는
(1) std::array 혹은 std::vector를 사용하면 된다.
(2) 정적 배열은 매개변수로 입력될 경우 포인터로 넘어간다. 배열의 개수를 따로 입력해주어야 한다.
#include <iostream>
using namespace std;

#define SIZE 4
void printElement(const int (&arr)[SIZE])
{
    for (int i = 0; i < SIZE; ++i)
        cout << arr[i] << " ";
}

int main()
{
    int arr[] = { 0, 1, 2, 3 };
    printElement(arr);
}
참고) g++은 const int 자료형으로 런타임에 배열의 크기를 정할 수 있다. MSVC는 Variable-Length Arrays(VLAs)를 지원하지 않는다.
7.4 주소에 의한 인수 전달
Passing Arguments by Addresss(Call by Address)
Call by Address는 주소값을 Call by Value로 활용하였다
- Call by Reference처럼 return 값을 대신하는 Out Parameter로 활용할 수 있다.
- Pointer 변수를 초기화 하여 사용한다. Pointer 자료형 저장공간만큼 메모리를 더 사용한다.
void getSinCos(const double& degrees, double* sin_out, double* cos_out)
{
    *sin_out = std::sin(10);
    *cos_out = std::cos(10);
}

int main()
{
    double sin(0.0);
    double cos(0.0);
    getSinCos(30.0, &sin, &cos);

    cout << sin << " " << cos << endl;
}
7.5 다양한 반환 값들(값, 참조, 주소, 구조체, 튜플)
Return Value, Return Pointer
- Return Pointer는 메모리 동적 할당에 사용된다. 함수 외부에서 해당 주소의 delete [ ]를 잊을 수 있다
int returnValue(int x)
{
    int value = x * 2;
    return value;
}

int* returnPointer(int size)
{
    return new int[size]
}

int main()
{
    int *arr = returnPointer(4);
    for (int i = 0; i < 4; ++i)
        arr[i] = i;

    for (int i = 0; i < 4; ++i)
        cout << arr[i] << endl;

    delete[] arr; // maybe forget to delete
}
Retrun Address
- 함수가 종료되며 지역변수의 주소를 반환한다. 이 주소는 곧 소멸할 수 있어 사용하기 위험하다.
int* returnAddrs(int x)
{
    int value = x * 2;
    return &value;
}

int main()
{
    int value = returnAddrs(3);
}
Call by Reference 활용 예제
- 외부에서 정의된 값을 함수 내부에서 수정하거나 함수 호출로 수정하고 싶을 때 유용하다.
#include <iostream>
#include <array>
using namespace std;

int& returnRefEx(std::array<int, 10> &arr, int index)
{
    return arr[index];
}
int main()
{
    std::array<int, 10> arr;
    arr[5] = -1;
    returnRefEx(arr, 5) = 10;
    cout << arr[5] << endl;
}
여러 변수를 반환하는 방법
(1) 구조체를 만들어 반환하기 ( Direct X가 이같은 형태로 구현되어 있다 )
- C 코딩시 많이 사용하며 속도가 빠르다
(2) Tuple 사용하기
#include <iostream>
#include <tuple>
using namespace std;

std::tuple<int, double, float> returntuple()
{
    int i = 5;
    double d = 3.14;
    float f = 9.8f;
    //return std::tuple<int, double, float>(i,d,f);
    return make_tuple(i,d,f);
}

int main()
{
    std::tuple<int, double, float> tp = returntuple();
    cout << get<0>(tp) << endl;
    cout << get<1>(tp) << endl;
    cout << get<2>(tp) << endl;
}
C++ 17부터 다음과 같이 사용할 수 있다
int main()
{
    auto[i,d,f] = returntuple();
    cout << i << endl;
    cout << d << endl;
    cout << f << endl;
}
7.6 인라인 함수 (inline Functions)
참고) 16.11 inline 함수 - https://hoplite.tistory.com/83
[홍정모의 따라하며 배우는 C언어] 16.전처리기와 라이브러리
16.1 전처리기가 해주는 일들 전처리기 이름은 컴파일러를 기준으로 만들었다. Visual Studio에서 "전처리기->컴파일러->링커->실행파일"을 빌드라 부른다. 컴파일이라 부르기도 한다. 16.2 전처리
hoplite.tistory.com
inline은 강제할 수 없다. Compiler가 선택한다
- 함수 호출시 발생하는 Overhead가 함수 내부를 실행하는 비용보다 클 때 inline은 유용하다.
- 현대에는 Compiler의 최적화 기능이 좋아져 굳이 inline을 사용할 필요가 없다. inline keyword로 구현된 함수가 많을 경우 Compile된 프로그램의 크기가 커진다. 프로그램의 크기가 커지면 inline으로 얻는 효율을 상쇄될 수 있다.
inline int min(int x, int y)
{
    return x > y ? y : x;
}

int main()
{
    cout << min(1, 2) << endl;
    cout << min(2, 1) << endl;
}
inline keyword 실행시 min(1,2)함수를 호출하면 아래와 같이 동작한다.
main()
{
    cout << (1 > 2 ? 2 : 1) << endl;
    cout << (2 > 1 ? 1 : 2) << endl;
}
7.7 함수 오버로딩
Function Overloading
함수 오버로딩은 다른 Parameter를 가지되 동일한 함수명을 중복하여 만든다
- return 자료형이 다르더라도 동일한 Parameter를 가진 함수 오버로딩은 redefinition을 발생시킨다. 금지.
- 동일한 함수명이 여럿 있을 때 매개변수가 가장 비슷한 함수를 찾아서 실행시킨다.
void test(char str)
{
    cout << str << endl;
}

void test(int i)
{
    cout << i << endl;
}

int main()
{
    test(75);                                    // >> 75
    test(char(75));                              // >> K
    test('A');                                   // >> A
}
변환할 자료형이 분명하지 않을 때 발생하는 Error
#include <iostream>
using namespace std;

void ambiguous(unsigned int i)
{
    cout << i << endl;
}
void ambiguous(float f)
{
    cout << f << endl;
}

int main()
{
    ambiguous(-2.2f);           // OK
    ambiguous(unsigned int(2)); // OK
    ambiguous(2u);              // OK

    // more than one instance of overloaded function "ambiguous" matches the argument list
    ambiguous(2);    // Error!
    ambiguous(3.14); // Error!
    ambiguous(-2.1); // Error!
}
Parameter가 Call by value일 때 const 자료형은 일반 자료형과 동일하게 취급된다
- 아래 코드는 에러를 발생시킨다
void test(int i) {
    cout << i << endl;
}

void test(const int i) { // Error! function 'void test(int)' already has a body
    cout << "const" << i << endl;
}
Parameter가 Call by reference, Call by address일 때 const 자료형은 일반 자료형과 다르게 취급한다
- 아래 코드는 문제없이 작동하며 reference도 동일하다.
void ambiguous(const int* ptr)
{
    cout << *ptr << endl;
}

void ambiguous(int* ptr)
{
    cout << *ptr << endl;
}

int main()
{
    int i = 5;
    const int cons_i = 10;

    ambiguous(&i);
    ambiguous(&cons_i);
}
typedef로 만든 별명과 같은 자료형은 동일하게 취급한다
- 아래 코드는 Compile time Error를 발생시킨다. error C2084: function 'int getNumber(int)' already has a body
int getNumber(int i)
{
    return 0;
}

typedef int my_int;
int getNumber(my_int i)
{
    return 1;
}

int main()
{
    cout << getNumber(int()) << endl;
}
7.8 매개변수의 기본값
Default Parameters
매개변수의 값이 지정되지 않았을 때 사용되는 기본값을 설정할 수 있다
void test_print(const char* str = "please pass string")
{
    cout << str << endl;
}

int main()
{
    test_print();                // >> please pass string
    test_print("is this work?"); // >> is this work?
}
사용예제) 매개변수의 값이 여러 개일 때 기본값 사용해보기
- argument와 Parameter가 차례로 짝지음을 알 수 있다.
void order_default_para(int x=10, int y=-10, int z=-20)
{
    cout << x << y << z << endl;
}

int main()
{
    order_default_para();        // >> 10 - 10 - 20
    order_default_para(0);       // >> 0 - 10 - 20
    order_default_para(0,-1);    // >> 0 - 1 - 20
    order_default_para(0,-1,-2); // >> 0 - 1 - 2
}
함수의 매개변수가 여럿일 때 기본값을 가지는 매개변수가 생기면 그 이후 매개변수는 기본값을 가져야 한다
- 아래 함수의 정의는 에러가 발생시킨다. default argument not at end of parameter list
void order_default_para(int x, int y=-10, int z){}
함수의 forward declaration(전방선언)과 함수의 Body 중 한 곳에서만 기본값을 할당 할 수 있다
- 보통 header파일에 있는 foward declaration에 기본값을 지정한다. 함수의 body를 직접 보는 경우보다 foward declaration에서 input ouput을 살피는 경우가 많다.
void order_default_para(int x = 10, int y = -10, int z = -20);
void order_default_para(int x, int y, int z)
{
    cout << x << y << z << endl;
}
OR
void order_default_para(int x, int y, int z);
void order_default_para(int x=10, int y=-10, int z=-20)
{
    cout << x << y << z << endl;
}
함수의 오버로딩과 매개변수 기본값이 만드는 에러
- 서로 다른 Parameter를 가지고 있어 함수 오버로딩이 가능하나 Parameter에 기본값이 있어 모호함이 생긴다.
- ambiguous call to overloaded function more than one instance of overloaded function matches the argument list
void ambiguous_diff(int x){}
void ambiguous_diff(int x, int y = 20) {}

int main()
{
    ambiguous_diff(5);
}
7.9 함수 포인터
Function Pointer
함수명은 주소값이다. Ampersand( & )를 붙여주지 않아도 된다
- 붙여주어도 상관은 없다
void function(){}
int main()
{
    cout << function << endl;
}
>> 00F614EC
Function Pointer의 활용
int function1()
{
    return 5;
}
int function2()
{
    return 10;
}

int main()
{
    int (*func_ptr)() = function1;
    cout << func_ptr() << endl; // >> 5

    func_ptr = function2;
    cout << func_ptr() << endl; // >> 10
}
함수 포인터를 함수 Parameter로 활용하기
#include <iostream>
#include <array>
using namespace std;

bool isSmaller_5(const int& num)
{
    if(num < 5) return true;
    else return false;
}
bool isBigger_3(const int& num)
{
    if(num > 3) return true;
    else return false;
}

void printIf(const array<int, 8>& arr, bool (*func_ptr_if)(const int&))
{
    for (int i : arr)
        if (func_ptr_if(i))
            cout << i << " ";
    cout << endl;
}

int main()
{
    std::array<int, 8> arr = {0,1,2,3,4,5,6,7};
    printIf(arr, isBigger_3);
    printIf(arr, isSmaller_5);
}
함수 Pointer를 Parameter로 활용할 때도 default 값을 사용할 수 있다
void printIf(const array<int, 8>& arr, bool (*func_ptr_if)(const int&) = isBigger_3)
{
    for (int i : arr)
        if (func_ptr_if(i))
            cout << i << " ";
    cout << endl;
}
typedef를 사용하여 함수포인터를 간단하게 표현할 수 있다
typedef bool (*func_ptr_if_t)(const int&);
void printIf(const array<int, 8>& arr, func_ptr_if_t func_ptr = isBigger_3)
{
    for (int i : arr)
        if (func_ptr(i))
            cout << i << " ";
    cout << endl;
}
using을 사용해도 간편하게 나타낼 수 있다
using using_func = bool(*)(const int &);
void printIf(const array<int, 8>& arr, using_func func_ptr = isBigger_3)
{
    for (int i : arr)
        if (func_ptr(i))
            cout << i << " ";
    cout << endl;
}
<function> library를 활용하기
- C++17에서 <function> library를 활용하여 function pointer를 다룰 수 있다.
#include <iostream>
#include <array>
#include <functional>
using namespace std;

bool isSmaller_5(const int& num)
{
    if(num < 5) return true;
    else return false;
}
bool isBigger_3(const int& num)
{
    if(num > 3) return true;
    else return false;
}

void printIf(const array<int, 8>& arr, std::function<bool(const int&)> func_ptr = isBigger_3)
{
    for (int i : arr)
        if (func_ptr(i))
            cout << i << " ";
    cout << endl;
}

int main()
{
    std::array<int, 8> arr = {0,1,2,3,4,5,6,7};

    std::function<bool(const int&)> funcptr = isBigger_3;
    printIf(arr, funcptr);

    funcptr = isSmaller_5;
    printIf(arr, funcptr);

    printIf(arr);
}
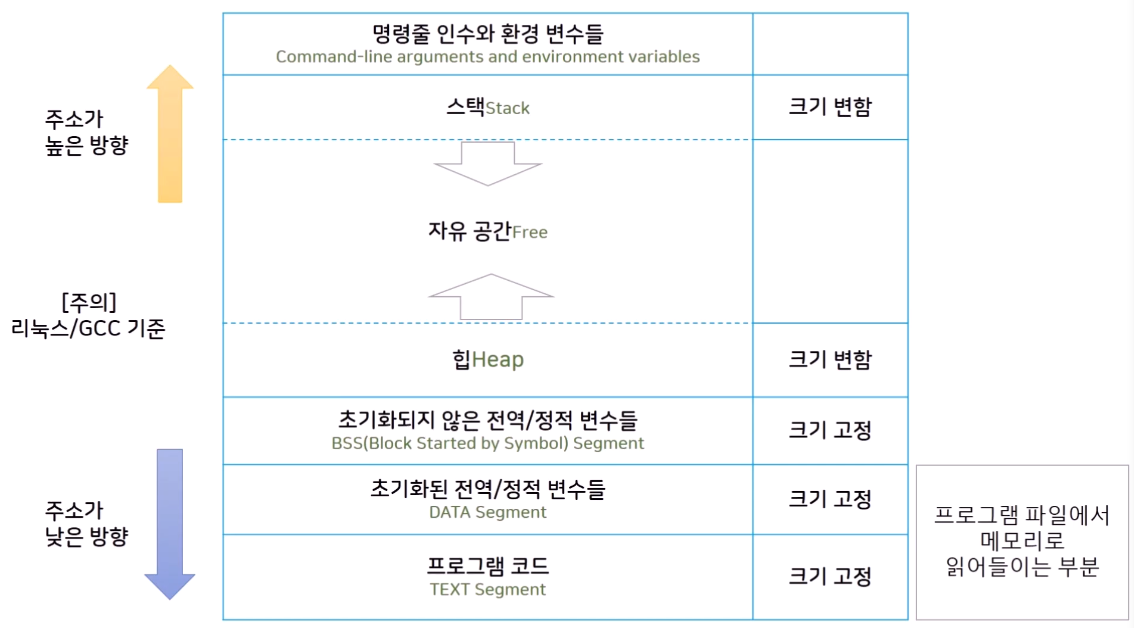
7.10 스택과 힙 the stack and the heap
참고) 12.1 메모리 레이아웃 훑어보기 - https://hoplite.tistory.com/78?category=906101
홍정모의 따라하며 배우는 C언어 12. Storage Classes, Linkage and Memory Management
12.1 메모리 레이아웃 훑어보기 Read Only Memory(Text Segment) 프로그램이 시작되면 해당 프로그램을 실행하기 위한 코드가 Read Only Memory에 저장된다. 이 Memory는 프로그램이 끝날 때까지 변경되지 않..
hoplite.tistory.com
작성한 코드를 실행시키면 운영체제는 다음과 같이 메모리 구조를 할당해준다
각 변수는 코드에서 정의된 바와 일치하는 곳에서 메모리를 사용한다
7.11 std vector를 스택처럼 사용하기
힙을 사용하려면 OS에 메모리를 요청하고 할당받는 과정을 거치기 때문에 느리다. vector를 잘 사용하려면 new와 delete 연산자가 최소한으로 호출되게 하자. size와 capacity를 구분하여 사용하면 된다
capacity와 size
(1) capacity : 사용할 수 있는 최대 memory 공간
(2) size : 사용하고 있는 memory
std::vector<int> v { 1, 2, 3 };
//int *v_ptr = new int[3]{1,2,3}; // not same like above but similar

cout << "size = " << v.size() << " capacity = " << v.capacity() << endl;
for(int &i : v)
    cout << i << " ";
size = 3 capacity = 3
1 2 3resize( ) 멤버함수를 사용해 size를 더 크게 변화시키면
- 이 때 크기를 늘려준 만큼 값 0이 출력되고 있다.
v.resize(5);
cout << "size = " << v.size() << " capacity = " << v.capacity() << endl;
for(int &i : v)
    cout << i << " ";
size = 5 capacity = 5
1 2 3 0 0resize( ) 멤버함수를 사용해 size를 더 작게 변화시키면
v.resize(2);
cout << "size = " << v.size() << " capacity = " << v.capacity() << endl;
for(int &i : v)
    cout << i << " ";
size = 2 capacity = 3
1 2size는 2지만 capacity는 3이다. 3번째(두 번째 index)에 접근해보자.
- 아래 접근방법은 모두 에러를 발생시킨다. vector size를 초과하는 값에 접근하면 에러가 발생하게 구현됨을 알 수 있다
cout << v[2] << endl;    //Error!
cout << v.at(2) << endl; //Error!
- 아래처럼 접근해보자. 값이 출력된다.
int* ptr = v.data();
cout << ptr[2] << endl; // >> 3
capacity가 줄어들지 않는 이유
- 해당 메모리를 반납하고 다시 재할당 받아 값을 복사하는 비용이 크다. 사용하지 않게된 index에 접근하면 Error를 발생시키고 접근하지 않게 만듬이 더 효율적이다.
capacity 조정하기(새로 동적할당 받기)
- 메모리를 다시 할당받는 멤버함수는 reserve( )이다. capacity가 다시 설정된다. 일단 동적메모리를 할당받고 나중에 size를 크게 바꾸어주어도 속도가 느려지지 않을 것이다.
- 동적메모리 공간을 재할당받은 v를 출력하면 size만큼만 출력된다. capacity는 영향을 주지 않는다.
std::vector<int> v { 1, 2, 3 };

v.reserve(64);
cout << "size = " << v.size() << " capacity = " << v.capacity() << endl;
size = 3 capacity = 64참고) capacity가 가득 찼을 때 push_back멤버함수를 사용하면 얼마만큼의 capacity를 가져올지는 컴파일러마다 다르다.
vector를 Stack처럼 활용하기
- capacity를 충분히 늘려놓으면 뒤에 값을 더 붙여도 new - delete 연산이 발생하지 않는다. capacity 제한 내에서 멤버함수 push_back과 pop_back을 사용하면 된다. vector를 stack처럼 활용해보자.
std::vector<int> stack;
stack.reserve(64);

stack.push_back(0);
stack.push_back(1);
stack.push_back(2);

stack.pop_back();
stack.pop_back();
stack.pop_back();
7.12 재귀적 함수 호출
Text Segment에 코드가 저장되어있다. 필요할 때마다 해당 함수를 가져와 사용한다. 이 때문에 함수 내부에서 자기 자신을 호출함이 가능하다
7.13 방어적 프로그래밍의 개념
Defensive Programming
에러가 발생하지 않게 프로그램을 만들자. 코딩을 하며 다양한 오류를 마주할 것이다.
Semantic Errors
- C++ 문법을 따르지 않을 때 발생하는 오류이다
Violated Assumption
- 사용자가 예상하지 않은 방법으로 프로그램을 사용할 수 있다. 예외처리가 되지 않을 때 발생하는 오류이다.
7.14 단언하기 assert
assert keyword를 사용하면 debugger의 도움을 받기 쉽다
- assert는 debug 모드에서만 작동한다. Release 모드에서 작동하지 않는다. Release 모드의 전처리 명령어를 확인하자

Runtime Error Check
코딩시 반드시 만족해야 하는 조건을 assert( expression )에서 확인하자
- expression 대신에 조건을 넣으면 된다
- 사용하기 위해 <cassert> 혹은 <assert.h>를 포함하자
#include <iostream>
#include <cassert>
#include <array>
using namespace std;

void printArray(std::array<int, 5>& arr, const int& idx)
{
    assert(0 <= idx);
    assert(unsigned int(idx) < arr.size() - 1 );
    cout << arr[idx] << endl;
}

int main()
{
    std::array<int, 5> arr = { 0, 1, 2, 3, 4 };
    //printArray(arr, -5);
    printArray(arr, 10);
}
Compiletime Error Check
- static_assert를 사용하면 Compile time에 에러를 확인할 수 있다.
- static_assert(expression, string message)에서 expression 내부에 사용되는 변수는 반드시 compile time에 결정되어야 한다. 따라서 const 자료형만 사용할 수 있다
- static_assert( ) 함수는 두 번째 Parameter에 Message를 남길 수 있다. 에러가 발생하면 해당 Message를 출력한다.
const int x = 10;
static_assert(x == -10, "x should be 10 but..");
7.15 명령줄 인수 command line arguments
C와 동일하게 작동한다. 참고) 11.10 명령줄 인수(CommandLine Arguments) - https://hoplite.tistory.com/76
홍정모의 따라하며 배우는 C언어 11 문자열 함수
11.1 문자열을 정의하는 방법 'H' 'e' 'l' 'l' 'o' '\0' ? ? ? 특정 컴파일러는 비어있는 공간을 '\0'으로 채워준다. Put( ) 함수의 활용법 #define MESSAGE "A Symbolic string constant" #define MAXLENGTH 81 p..
hoplite.tistory.com
예제
#include <iostream>
using namespace std;

int main(int argc, char* argv[])
{
    for (int i = 0; i < argc; ++i)
    {
        cout << argv[i] << endl;
    }
}
프로그램을 실행시키며 띄어쓰기로 구분된 값을 입력시켜 보자
- 아래와 같이 띄어쓰기로 구분된 값이 각각 출력됨을 알 수 있다.

다음은 C++ Command line arguments를 쉽게 사용하기 위한 Library이다
https://www.boost.org/doc/libs/1_78_0/doc/html/program_options.html
Chapter 31. Boost.Program_options - 1.78.0
The program_options library allows program developers to obtain program options, that is (name, value) pairs from the user, via conventional methods such as command line and config file. Why would you use such a library, and why is it better than parsing y
www.boost.org
7.16 생략부호 Ellipsis
C와 C++의 Ellipsis 사용법이 동일하다 참고) 16.17 가변 인수 - https://hoplite.tistory.com/83
[홍정모의 따라하며 배우는 C언어] 16.전처리기와 라이브러리
16.1 전처리기가 해주는 일들 전처리기 이름은 컴파일러를 기준으로 만들었다. Visual Studio에서 "전처리기->컴파일러->링커->실행파일"을 빌드라 부른다. 컴파일이라 부르기도 한다. 16.2 전처리
hoplite.tistory.com
사용예제
#include <iostream>
#include <cstdarg> // For ellipsis
using namespace std;

double findAverage(int count, ...)
{
    double sum = 0;

    va_list list; // type va_list is char*
    va_start(list, count);
    for (int i = 0; i < count; ++i)
        sum += va_arg(list, int);
    va_end(list);

    return sum / count;
}

int main()
{
    cout << findAverage(7, 0,1,2,3,4,5,6) << endl;
}
'Programming Language > C++' 카테고리의 다른 글
| [홍정모의 따라하며 배우는 C++] 9.연산자 오버로딩 (0) | 2021.12.25 |
|---|---|
| [홍정모의 따라하며 배우는 C++] 8. 객체지향의 기초 (0) | 2021.12.24 |
| [홍정모의 따라하며 배우는 C++] 6. 행렬, 문자열, 포인터, 참조 (0) | 2021.12.19 |
| [홍정모의 따라하며 배우는 C++] 5.흐름제어 (0) | 2021.12.17 |
| [홍정모의 따라하며 배우는 C++] 4.변수 범위와 더 다양한 변수형 (0) | 2021.12.15 |