
배움 저장소
[홍정모의 따라하며 배우는 C++] 19. 모던 C++ 필수 요소들 본문
19.1 람다 함수와 std::function std::bind, for_each
Lambda
익명 함수를 만들기 위하여 lambda람다를 사용한다
/* lambda
[] : lambda - introducer
() : lambda - parameter - declaration
-> : lambda - return - type - clause
{} : compound - statement             */
auto lambda = [](const int&i)-> void { cout << "Hello World" << endl; };
lambda(1);

// anonymous lambda
[](const int& i)-> void { cout << "Hello World" << endl; }(10);

cout << []() -> int{ return -11; }() << endl;
>> Hello World
>> Hello World
>> -11
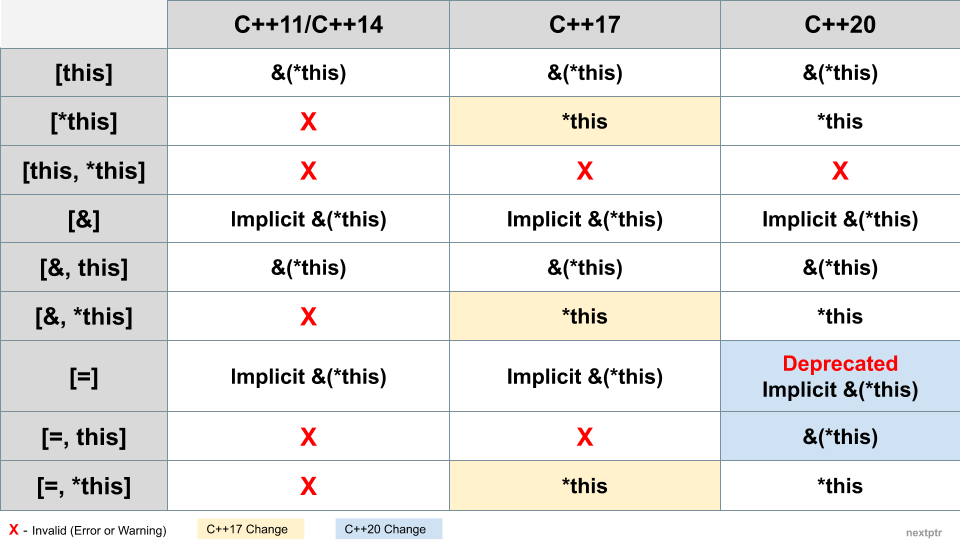
Lamda - Capture clause
- 람다 함수의 매개변수를 다양한 방법으로 설정할 수 있다.
- Ampersand(&)를 사용하면 람다 함수 내에서 해당 영역에 있는 모든 변수를 참조할 수 있다.
- Equal sign(=)를 사용하면 람다 함수 내에서 해당 영역에 있는 모든 변수를 복사하여 사용할 수 있다.
{
    /* reference var */
    string name = "Huberman";

    //[](){std:: cout << &name << endl;}(); // Error!

    [&](){std:: cout << &name << endl;}(); // Get all var in the scope
    [&name]() {std::cout << &name << endl; }(); // Get only "name" var in the scope
    //[this]() {std::cout << &name << endl; }(); // for class


    /* copy var */
    [=]() {std::cout << &name << endl; }(); // Get all var in the scope
    [name]() {std::cout << &name << endl; }(); // Get all var in the scope

    //[*this]() {std::cout << name << endl; }(); // c++17
}
Lambda와 STL
STL과 함께 활용할 수 있다.
- for_each를 사용하여 for-반복문을 lambda로 간단하게 표현할 수 있다
vector<int> v;
v.push_back(1);
v.push_back(2);

auto printLambda = [](int i) { cout << i << endl; };
for_each(v.begin(), v.end(), printLambda); // <algorithm>

// much simpler
for_each(v.begin(), v.end(), [](int i) { cout << i << endl; }); // <algorithm>
std::function
- std::function을 사용하여 람다를 관리할 수 있다. <functional>을 포함시켜 주자
auto func = [](int val)->void{ cout << val << endl; };
std::function<void(int)> f_ptr = func;
f_ptr(5);
>> 5
std::bind를 사용하여 함수 매개변수를 특정하여 사용할 수 있다.
std::function<void()> f_ptr_with_bind = std::bind(func, 123);
f_ptr_with_bind();
>> 123
function과 bind를 활용하여 멤버함수를 호출해보자
- std::bind와 함께 placeholders를 사용해주자. function을 초기화할 때 필요한 매개변수만 지정해줄 수 있다
- 멤버함수를 묶어주기 위해서 클래스 인스턴스의 주소를 매개변수로 사용하자.
class Object {
public:
    void printHello(const string& s) {
        cout << "Hello:" << s << endl;
    }
};

int main()
{
    Object instance;

    //std::function<void(const string &s)>m_f_ptr....
    auto m_f_ptr = std::bind(&Object::printHello, &instance, std::placeholders::_1);
    m_f_ptr("World");
}
placeholder를 bind와 함께 사용하여 특정 매개변수만 지정해보기
void func(int a, int b, int c)
{
    cout << (a - b - c) << endl;
}

int main()
{
    auto fn1 = bind(func, placeholders::_1, 2, 3);
    fn1(10);

    auto fn2 = bind(func, 2, placeholders::_1, 3);
    fn2(10);
}
5
-11
19.2 C++ 17 함수에서 여러 개의 리턴값 반환하기
Tuple을 사용하면 여러 값을 반환할 수 있다
#include <iostream>
#include <tuple>
using namespace std;

//tuple<int, int, int> return_tuple(int i, int j, int k){
auto return_tuple(int i, int j, int k) {
    //return tuple<int, int, int>(i * 10, j * 10, k * 10);
    return tuple(i * 10, j * 10, k * 10); // c++ 17
}

int main()
{
    //tuple<int, int, int> t = return_tuple(1, 2, 3);
    auto t = return_tuple(1, 2, 3);
    cout << get<0>(t) << " " << get<1>(t) << " " << get<2>(t) <<endl;

    auto [a,b,c] = return_tuple(-1,-2,-3); // c++ 17
    cout << a << " " << b << " " << c << endl;
}
19.3 std thread와 멀티쓰레딩 기초
- 멀티 쓰레딩은 네트워크 병렬처리(분산처리)와 다르게 변수(메모리 공간)을 공유하기에 편리하다.
- 공유하는 변수는 모든 쓰레드가 접근가능한 영역에 정의되어 있어야한다.
- std::thread는 c++17에 표준으로 도입되었다
Process:
- OS가 프로그램을 관리하는 단위이다. 하나의 Process가 여러 Thread를 관리할 수 있다. CPU의 여러 코어를 활용하여 동시에 작업하기 위해 Thread를 사용한다.
- CPU core는 hyperthreading을 사용하여 core 개수의 2배가 되는 Logical processor를 획득한다. Processor는 프로그램을 실행한다. 프로그램이 진행됨이 Process인 것이다. 이 때 하나의 Process는 하나의 Logical processor를 차지한다.
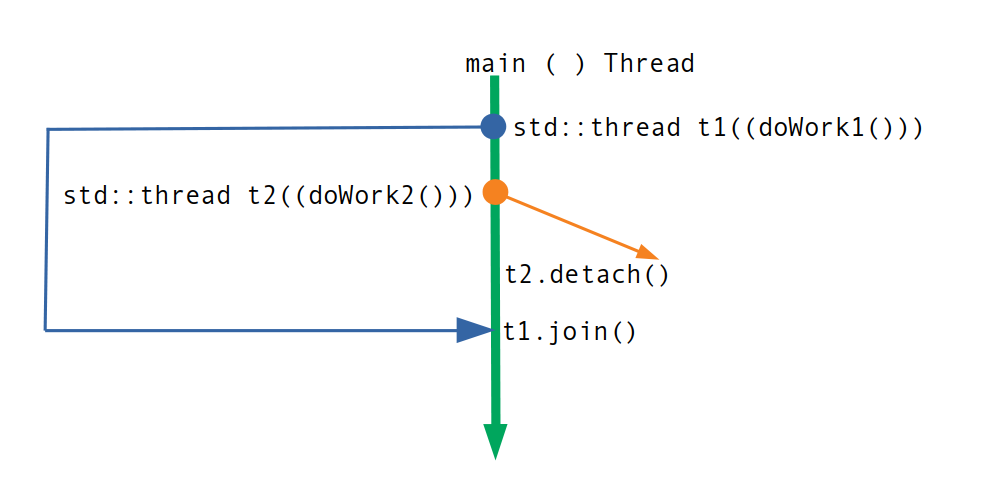
Thread 사용해보기 <thread>를 포함시키자.
- main함수에서 특정 thread를 실행시킨 후 다시 해당 thread의 멤버함수 join를 호출해주자. 해당 thread가 종료될 때까지 대기한다. 멤버함수 join이 없으면 thread가 종료되기 전 main함수가 종료되 에러가 발생한다.
// main thread's id
cout << std::this_thread::get_id() << endl; // >> 1716

// how to use
std::thread t1 = std::thread([](){
    cout << std::this_thread::get_id() << endl; // >> 2656
    while (true) {} });

std::thread t2 = std::thread([]() {
    cout << std::this_thread::get_id() << endl; // >> 13016
    while (true) {} });

t1.join(); // wait untill thread 1's work done// without it error!
t2.join(); // wait untill thread 2's work done// without it error!
vector를 사용하여 thread를 호출할 수 있다
//// check logical processor
const int logical_processor = std::thread::hardware_concurrency();
vector<std::thread> v;

// matching threads to count of processor
// but as program's needs, use differ threads
v.resize(logical_processor-4);

// main thread's id
cout << std::this_thread::get_id() << endl; // >> 1716

for (auto& e : v) {
    e = std::thread([]() {
        cout << std::this_thread::get_id() << endl;
        while (true) {} });
}

for (auto& e : v)
    e.join();
- 위 예제는 서로 다른 thread가 동시에 진행되며 console output에 출력값을 남긴다. 여러 thread가 동시에 실행되기 때문에 여러 출력값이 섞인다.
<mutex>로 다른 thread의 특정 코드와 짝을 지어 실행할 수 있다
- mutex는 main 함수 내부에 정의될 수 없다. global로 정의하자
- 멤버함수 lock과 unlock을 활용하자. lock을 사용하면 다른 thread의 코드가 실행되지 않는다. 여러 출력값이 섞이는
걸 막아줄 수 있다. 섞이기 싫은 코드가 종료되면 반드시 unlock을 해주어야 진행된다.
mutex mtx; // mutual exclusion(상호 배제). 다른 쓰레드가 해당 구역에 접근불가

int main(){

    auto lambda = [](const string& s) {
        for (int i = 0; i < 5; ++i) {
            this_thread::sleep_for(chrono::milliseconds(100));

            mtx.lock();
            cout << this_thread::get_id() << s << i << endl;
            mtx.unlock();
        }
    };

    thread t1(lambda, "thread one ");
    thread t2(lambda, "thread two ");
    t1.join();
    t2.join();
}
19.4 레이스 컨디션, std::atomic, std::scoped_lock
Race Condition
- 레이스 컨디션은 같은 메모리 공간을 사용하여 에러가 발생하는 경우를 일컫는다.
Race Condition
다음 예제는 여러 thread가 동일한 변수(저장공간)에 접근하여 발생하는 문제를 보여준다.
- shared_memory는 전역변수로 선언되었다. main 내 지역변수로 사용한다면 lambda에 ampersand를 더해주자.
- 이 때 sleep_for가 없으면 다음 thread가 실행되기 전에 이전 thread가 종료되어 테스트가 불가능하다.
int shared_memory(0);

int main(){

    auto increment = []() {
        for (int i = 0; i < 1000; ++i) {
            this_thread::sleep_for(chrono::milliseconds(1)); // slow down for capture problem
            shared_memory++;
        }
    };

    thread t1 = thread(increment);
    thread t2 = thread(increment);

    t1.join();
    t2.join();

    cout << "After" << endl;
    cout << shared_memory << endl;
}
>> After
>> 1999결과값은 2000이 아닌 1999가 나왔다. 후위연산자는 더하기 전 값을 반환하고 임시 값을 만들어 1을 더한 후 저장공간에 대입한다. 만약 다른 thread가 이 과정중에 후위연산자 연산을 끝낸다면 위 계산 결과가 씹힐 것이다.
Race Condition 해결하기
std::atomic
- atomic은 변수가 임시 값을 만들고 다시 할당하는 과정을 하나로 묶어는다. 그러면 다른 thread가 끼어들 수 없어 race condition이 발생하지 않는다. 이 때 shared_memory++는 atomic 클래스에서 오버로딩된 ++ 연산자이다.
- <atomic>을 포함시키고 위에서 전역변수로 설정된 shared_memory를 atomic으로 초기화해주자.
atomic<int> shared_memory(0);
// shared_memory.fetch_add(1);
atomic을 사용하면 일반 자료형을 사용하는 것보다 느리다.
std::mutex
- mutex의 멤버함수 lock과 unlock을 사용할 수 있다.
- c++17부터 lock_gurad를 지원한다. 만약 unlock을 호출하지 못하고 종료되었을 때 자동으로 unlock을 실행시킨다.
- scoped_lock은 lock_guard보다 진보된 형태이다. scoped_lock 사용을 권한다.
auto increment = []() {
    for (int i = 0; i < 1000; ++i) {
        this_thread::sleep_for(chrono::milliseconds(1)); // slow down for capture problem

        //mtx.lock();
        std::lock_guard lock(mtx);
        //std::scoped_lock(mtx);

        shared_memory++;
        //mtx.unlock();
    }
};
19.5 작업 기반 비동기 프로그래밍
Task base Programming (Async, future, promise)
Thread vs Async
thread보다 async를 더 선호하여 사용한다
- thread는 thread 관리를 직접 할 수 있어 유용하다. async는 thread를 직접 관리하지 않는다. 그 대신 실행되는 코드에 집중할 수 있다.
- async의 결과값은 future 클래스에 저장된다. future는 해당 thread가 끝날 때까지 대기하여 값을 저장한다.
- future 클래스의 멤버함수 get을 보자. 만약 멀티쓰레딩 실행 중 get함수가 future<..> = async보다 먼저 호출되었다면 대기하고 이후에 get이 실행된다.
- async는 join이 필요하지 않다. thread는 내부에서 자동으로 관리된다.
// multi threading
{
    int result;
    thread t([&]{ result = 1+2; });
    t.join();
    cout << result << endl;
}

// task-based paralleism
{
    //auto fut = std::async([]{ return 1+2; });
    future<int> fut = std::async([] { return 1 + 2; });

    cout << fut.get() << endl; // if get() execute before above, wait till end
}
thread 클래스에서 future 클래스 사용하기
- thread 클래스에서 future 클래스를 사용하려면 promise 클래스를 경유해야 한다.
1. future 인스턴스에 promise 멤버함수 결과값을 넣는다.
2. thread에서 promise 클래스를 매개변수로 사용하되 R-value Reference로 받는다.
3. lambda body에서 매개변수의 멤버함수 set_value를 호출한다.
4. thread의 매개변수로 promise 인스턴스를 R-value Rference로 넘긴다.
- 이를 사용하면 미래에서 약속을 기다리는 형태가 된다.
// future and promise
{
    std::promise<int> prom; // templatize
    auto fut = prom.get_future();

    auto t = std::thread([](std::promise<int>&& p){ p.set_value(1+2); }, std::move(prom) );
    cout << fut.get() << endl;
    t.join();
}
Thread와 Async의 코드 실행 순서
async를 future와 사용하지 않고 단독으로 사용하면 아래 코드는 순차적으로 실행된다
- thread가 동시에 실행되지 않고 순차적으로 실행됨을 알 수 있다. 꼭 저장공간을 만들어 값을 할당해주자.
std::async([] {
    cout << "async1 start" << endl;
    this_thread::sleep_for(chrono::seconds(2));
    cout << "async1 end" << endl;
    });

std::async([] {
    cout << "async2 start" << endl;
    this_thread::sleep_for(chrono::seconds(1));
    cout << "async2 end" << endl;
    });

cout << "Main function end" << endl;
async1 start
async1 end
async2 start
async2 end
Main function end
Async와 future를 함께사용하면 나머지 코드를 실행한뒤 async 내부 코드를 실행한다
-async는 future 클래스와 함께 사용하자 : 여러 thread가 동시에 시작한다.
auto f1 = std::async([]{
    cout << "async1 start" << endl;
    this_thread::sleep_for(chrono::seconds(2));
    cout << "async1 end" << endl;
});

auto f2 = std::async([] {
    cout << "async2 start" << endl;
    this_thread::sleep_for(chrono::seconds(1));
    cout << "async2 end" << endl;
});

cout << "Main function end" << endl;
>> Main function end
>> async1 start
>> async2 start
>> async2 end
>> async1 end
thread는 나머지 코드를 원래의 순서대로 실행한다
auto f1 = std::thread([]{
    cout << "thread1 start" << endl;
    this_thread::sleep_for(chrono::seconds(2));
    cout << "thread1 end" << endl;
});

auto f2 = std::thread([] {
    cout << "thread2 start" << endl;
    this_thread::sleep_for(chrono::seconds(1));
    cout << "thread2 end" << endl;
});

f1.join();
f2.join();
cout << "Main function end" << endl;
thread1 startthread2 start
thread2 end
thread1 end
Main function end
19.6 멀티쓰레딩 예제 (벡터 내적)
1억개의 숫자를 가진 두 벡터가 있다. 벡터끼리의 내적을 계산하는 예제를 구현해보자
그 전에 예제에 사용할 여러 기능 코드를 소개한다
다음 코드는 1부터 10범위의 숫자를 랜덤하게 생성한다.
random_device seed;
mt19937 engine(seed());
uniform_int_distribution<> uniformDist(1,10);

for (int i = 0; i < 10; ++i)
    cout << uniformDist(engine) << " ";
아래 코드는 코드가 실행되는 시간을 측정한다.
const auto sta = chrono::steady_clock::now();
const chrono::duration<double> dur = chrono::steady_clock::now() - sta;
cout << dur.count() << endl; // show duration time
아래 코드는 내적을 계산하는 코드이다.
void dotProductNaive(const vector<int>& v0, const vector<int>& v1,
const unsigned i_start, const unsigned i_end, unsigned long long& sum){
    for (unsigned i = i_start; i < i_end; ++i)
        sum += v0[i] * v1[i];
}
이제 벡터의 내적을 계산해보자
- 각 local영역을 설정하여 영역 내부에서 각각 벡터의 내적을 계산하였다.
- 첫 예제는 쓰레딩 없이 실행하였으며 두 번째 예제는 멀티 쓰레딩을 이용하였다.
- 멀티 쓰레딩을 할 때 계산량을 잘 나누어주어야 한다. 나머지가 있다면 남은 데이터를 여러 쓰레드에 나누어주자.
#include <chrono>
#include <iostream>
#include <random>
#include <thread>
#include <vector>
#include <numeric>   // std::inner_product

#include <future>
#include <mutex>
#include <utility>
#include <atomic>
#include <execution> // parallel execution

using namespace std;

void dotProductNaive(const vector<int>& v0, const vector<int>& v1,
const unsigned i_start, const unsigned i_end, unsigned long long& sum){
    for (unsigned i = i_start; i < i_end; ++i)
        sum += v0[i] * v1[i];
}

int main(){
    const long long n_data = 100'000'000;
    const unsigned n_threads = 4;

    vector<int> v0, v1;
    v0.reserve(n_data);
    v1.reserve(n_data);

    random_device seed;mt19937 engine(seed());
    uniform_int_distribution<> uniformDist(1,10);

    for (long long i = 0; i < n_data; ++i) {
        v0.push_back(uniformDist(engine));
        v1.push_back(uniformDist(engine));
    }

    cout << "std::inner_product" << endl;
    {
        const auto sta = chrono::steady_clock::now();

        const auto sum = std::inner_product(v0.begin(), v0.end(), v1.begin(), 0ull);
                  // presume length v0 and v1 are same   only begin ^    unsigned long long
					// 0ull을 지정하지 않으면 int 자료형이 되어 auto keyword를 사용한
                   	// sum의 자료형이 int가 되어 overflow가 발생할 수 있다

        const chrono::duration<double> dur = chrono::steady_clock::now() - sta;
        cout << dur.count() << endl; // show duration time
        cout << sum << endl;
        cout << endl;
    }

    cout << "TEST" << endl;
    {
        const auto sta = chrono::steady_clock::now();

        unsigned long long sum = 0;

        vector<thread> threads;
        threads.resize(n_threads);

        const unsigned n_per_thread = n_data / n_threads; // assumes remainder = 0
        for(unsigned t=0; t<n_threads; ++t)
            threads[t] = std::thread(dotProductNaive, std::ref(v0), std::ref(v1), // arguments of fuc
                t* n_per_thread, (t+1) * n_per_thread, std::ref(sum)); // ref for reference
            //  ^(begin and end) slicing data to each thread

        for(unsigned t=0; t< n_threads; ++t)
            threads[t].join();

        const chrono::duration<double> dur = chrono::steady_clock::now() - sta;
        cout << dur.count() << endl; // show duration time
        cout << sum << endl;
    }
}
std::inner_product
0.0376082
3024949738
Test
0.340331
815427995결과값을 확인해보자. 멀티쓰레딩을 사용한 경우 race condition 현상이 나타남을 확인할 수 있다.
Lock gurad와 atomic을 사용하여 race condition 현상을 방지할 수 있다
Lockguard 사용해보기
- dotProductNative 함수를 아래 dotProductLock 함수로 변경하였다. lock_guard를 사용한다.
void dotProductLock(const vector<int>& v0, const vector<int>& v1,
    const unsigned i_start, const unsigned i_end, unsigned long long& sum){

    for (unsigned i = i_start; i < i_end; ++i) {
        scoped_lock lock(mtx);
        sum += v0[i] * v1[i];
}
- "Test" 영역내 for반복문 내부를 다음과 같이 수정하였다.
        const unsigned n_per_thread = n_data / n_threads;
        for (unsigned t = 0; t < n_threads; ++t)
            threads[t] = std::thread(dotProductLock, std::ref(v0), std::ref(v1),
                t * n_per_thread, (t + 1) * n_per_thread, std::ref(sum));
std::inner_product
0.0378516
3024829226
Test
3.4661
3024829226- 결과값을 보면 더이상 race condition 현상이 나타나지 않음을 확인할 수 있다.
- 멀티쓰레딩을 사용하여 더 많은 시간을 소모하였다. for-반복문 내부에 사용된 lock_guard가 비효율적임을 보여준다.
- lock_guard를 for-반복문 밖으로 끄집어내보자. 함수 전체에 적용하여 lock_guard로 적용하면 병렬처리가 적용되지 않고 각 thread가 순차적으로 실행된다.
atomic 사용해보기
- atomic은 해당 변수 계산과 값 할당을 묶어주어 race condition 현상을 막아준다. 원본 코드에서 sum의 자료형을 atomic으로 변경해주었다.
        atomic<unsigned long long> sum = 0;

        const unsigned n_per_thread = n_data / n_threads;
        for (unsigned t = 0; t < n_threads; ++t)
            threads[t] = std::thread(dotProductAtomic, std::ref(v0), std::ref(v1),
                t * n_per_thread, (t + 1) * n_per_thread, std::ref(sum));
void dotProductAtomic(const vector<int>& v0, const vector<int>& v1,
const unsigned i_start, const unsigned i_end, atomic<unsigned long long>& sum){
for (unsigned i = i_start; i < i_end; ++i)
sum += v0[i] * v1[i];
}std::inner_product
0.0356404
3025054348
Test
0.706072
3025054348atomic 역시 for-반복문 내부에 사용되어 비효율적임을 확인할 수 있다.
빈번하게 호출되는 코드에서 효과적인 멀티쓰레딩 구현하기
future 사용해보기
- 쓰레딩이 진행되면 future는 하나의 쓰레드를 맡는다. 이 때 쓰레드가 반환할 값을 future 내부에 저장한다. async가 종료되고 난 뒤 멤버함수 get으로 해당 결과값을 가져가자.
- 전역 변수에 여러 쓰레드가 접근하는 일 없이 로컬 변수를 저장해두었다가 계산이 끝날 때 모두 더해주고 있다
cout << "Test" << endl;
{
    const auto sta = chrono::steady_clock::now();

    vector<future<unsigned long long>> futures;
    futures.resize(n_threads);

    const unsigned n_per_thread = n_data / n_threads;
    for (unsigned t = 0; t < n_threads; ++t)
        futures[t] = std::async(dotProductFuture, std::ref(v0), std::ref(v1),
            t * n_per_thread, (t + 1) * n_per_thread); // sum is local var in func

    unsigned long long sum = 0;
    for (auto& e : futures)
        sum += e.get();

    const chrono::duration<double> dur = chrono::steady_clock::now() - sta;
    cout << dur.count() << endl; // show duration time
    cout << sum << endl;
}
auto dotProductFuture(const vector<int>& v0, const vector<int>& v1,
const unsigned i_start, const unsigned i_end){
unsigned long long sum = 0; // local sum
for (unsigned i = i_start; i < i_end; ++i)
sum += v0[i] * v1[i];
return sum;
}
효율적으로 작동함을 알 수 있다. async와 future를 잘 사용하자!
std::inner_product
0.0361887
3025473540

Test
0.0231405
3025473540
future와 thread를 함께 사용하기
cout << "Thread and future" << endl;
{
    const auto sta = chrono::steady_clock::now();

    vector<thread> threads(n_threads);
    vector<promise<int>> prom(n_threads);
    vector<future<int>> futures(n_threads);


    const unsigned n_per_thread = n_data / n_threads;
    for (unsigned t = 0; t < n_threads; ++t) {
        futures[t] = prom[t].get_future();
        threads[t] = std::thread(dotProductTnF, std::ref(v0), std::ref(v1),
            t * n_per_thread, (t + 1) * n_per_thread, move(prom[t])); // sum is local var in func
    }

    for (unsigned t = 0; t < n_threads; ++t)
        threads[t].join();

    unsigned long long sum = 0;
    for (unsigned t = 0; t < n_threads; ++t)
        sum += futures[t].get();

    const chrono::duration<double> dur = chrono::steady_clock::now() - sta;
    cout << dur.count() << endl; // show duration time
    cout << sum << endl;
}
auto dotProductTnF(const vector<int>& v0, const vector<int>& v1,
const unsigned i_start, const unsigned i_end, std::promise<int>&& p){
int sum = 0;
for (unsigned i = i_start; i < i_end; ++i)
sum += v0[i] * v1[i];
p.set_value(sum);
}std::inner_product
0.0359273
3024630248
Thread and future
0.0232756
3024630248효율적으로 작동함을 확인할 수 있다
c++ standard library는 벡터의 내적을 멀티쓰레딩으로 구현한 함수를 제공한다. <numeric>을 포함시키자
- async로 구현한 결과와 크게 차이가 나지 않음을 확인할 수 있다. 편하게 사용할 수 있다.
cout << "std::transform_reduce" << endl;
{
    const auto sta = chrono::steady_clock::now();

    //auto sum = std::transform_reduce(std::execution::seq, v0.begin(), v0.end(), v1.begin(), 0ull);
                                        // sequencial  ^
    auto sum = std::transform_reduce(std::execution::par, v0.begin(), v0.end(), v1.begin(), 0ull);
                                        // pararellel  ^
    const chrono::duration<double> dur = chrono::steady_clock::now() - sta;
    cout << dur.count() << endl; // show duration time
    cout << sum << endl;
}
std::transform_reduce
0.0253282
3025268685
19.7 완벽한 전달과 std::forward
Perfect Forwarding and
복습하기 L-value reference와 R-value reference는 다르다
- 매개변수가 다르면 이름이 같더라도 다시 정의할 수 있는데 이를 오버로딩이라 한다. 아래와 같이 원본 주소값을 참조하는 L-value 참조자와 임시 값의 원본주소를 가져오는 R-value 참조자는 다른 용도로 사용할 수 있다.
struct TStruct{};
void test(TStruct& T) {
    cout << "Pass by L-ref" << endl;
}
void test(TStruct&& T) {
    cout << "Pass by R-ref" << endl;
}

int main(){
    TStruct T;

    test(T); // L-ref

    //test(move(T)); // R-ref
    test(TStruct()); // R-ref
}
Pass by L-ref
Pass by R-ref
오버로딩 L-value Reference와 R-value Reference의 문제점: Template 구현
- template를 사용하면 L-value reference와 R-value reference를 구분하지 못한다
template<typename T>
void func_wrapper(T t){
    test(t);
}

int main(){
    TStruct T;
    func_wrapper(T);
    func_wrapper(TStruct());
    func_wrapper(move(T));
}
Pass by L-ref
Pass by L-ref
Pass by L-ref
Template으로 구현된 코드에서 R-value Reference를 사용하는 방법
1. <utility>를 포함시키자.
2. Template으로 구현된 함수에서 매개변수를 R-value reference로 가져오자.
3. foward와 함께 해당 매개변수를 사용하면 된다.
이 때 forward 함수는 매개변수가 L-ref일 때 L-ref를 전달하고 R-ref일 때 R-ref를 전달한다.
template<typename T>
void func_foward(T&& t){
    test(std::forward<T>(t));
}

int main(){
    TStruct T;
    func_foward(T);
    func_foward(TStruct());
    func_foward(move(T));
}
Pass by L-ref
Pass by R-ref
Pass by R-ref
forward 사용하기
forward 사용법을 설명하는데 필요한 CustomVector클래스이다
class CustomVector {
public:
    unsigned n_data = 0;
    int *ptr = nullptr;
    CustomVector(const unsigned& _n_data, const int& _init = 0) {
        cout << "Constructor" << endl;
        init(_n_data, _init);
    }
    CustomVector(CustomVector& l_input) {
        cout << "Copy Constructor" << endl;
        init(l_input.n_data);
        for(unsigned i=0; i<n_data; ++i)
            ptr[i] = l_input.ptr[i];
    }
    CustomVector(CustomVector&& r_input) {
        cout << "Move Constructor" << endl;

        this->ptr = r_input.ptr;
        r_input.ptr = nullptr;

        this->n_data = r_input.n_data;
        r_input.n_data = 0;
    }
    ~CustomVector() {
        delete[] ptr;
    }
    void init(const unsigned& _n_data, const int& _init = 0) {
        n_data = _n_data;
        ptr = new int[n_data];
        for(unsigned i=0; i<n_data; ++i)
            ptr[i] = _init;
    }
};
아래는 CustomVector의 생성자를 호출하는 함수로 L-ref와 R-ref에 모두 사용할 수 있도록 오버로딩되었다.
void callConstructor(CustomVector& vec) {
    cout << "Pass by L-Ref" << endl;
    CustomVector new_v(vec);
}

void callConstructor(CustomVector &&vec) {
    cout << "Pass by R-Ref" << endl;
    CustomVector new_v(move(vec)); // must use move
}
위 두 함수를 한 번에 사용할 수 있는 template 함수를 구현해보자. template 함수는 매개변수를 그냥 사용했을 때 R-ref와 L-ref를 구별하지 못한다. 매개변수를 R-ref로 받고 foward를 사용하여 매개변수를 다음 함수로 넘겨야 한다.
template<typename T>
void callTemplateConstructor(T&& vec) {
    callConstructor(forward<T>(vec));
}

int main() {
    CustomVector cusV(5);

    callTemplateConstructor(cusV);
    callTemplateConstructor(CustomVector(5,1));
}
Constructor
Pass by L-Ref
Copy Constructor
Constructor
Pass by R-Ref
Move Constructor
19.8 자료형 추론 auto와 decltype
Type Inference
Auto keyword
특정 값의 자료형이 분명한 경우 auto keyword를 사용하여 자료형 표기를 생략할 수 있다.
std::vector<int> vect;
for (std::vector<int>::iterator itr = vect.begin(); itr != vect.end(); ++itr)
    cout << *itr;

for (auto itr = vect.begin(); itr != vect.end(); ++itr)
    cout << *itr;

for (auto itr:vect)
    cout << itr;
auto keyword를 사용하여도 const, reference, volatile은 무시된다
- 아래 예제에서 const int &인 c_r_x를 auto로 받으면 int가 됨을 알 수 있다.
- 따라서 c_auto_crx처럼 auto keyword를 사용할 때 const와 reference는 따로 붙여주어야 한다.
int x = int();
auto auto_x = x;

const int &c_r_x = x;  // const int ref
auto auto_crx = c_r_x; // int

const auto& c_auto_crx = c_r_x; // specifing const and ref
- volatile keyword는 컴파일러에게 최적화 대상이 아님을 지정한다. 멀티쓰레딩에 사용할 수 있다.
- volatile keyword도 auto가 자동으로 인식하지않아 따로 붙어주어야 한다.
volatile int v_x = 10;
auto auto_v_x = v_x;  // int

volatile auto v_v_x = v_x; // volatile int
Template 매개변수의 자료형 추론
- visual studio에서 템플릿 함수의 인스턴스를 컴파일 전에 확인할 수 있다.
- 템플릿 함수의 매개변수는 인자의 자료형을 이어받지만 const와 reference는 예외이다. 아래 함수는 인자를 const, reference로 지정되었음에도 함수 내부에서는 copied 자료형으로 받아들인다.
template<class T>
void checkArgNrm(T arg) {}

int main() {
    const int &crx = 10;
    checkArgNrm(crx); // take int
}
때문에 아래와 같이 const와 reference를 템플릿 함수의 매개변수에 지정해주어야 한다.
template<class T>
void checkArgCR(const T& arg){}

int main() {
    const int &crx = 10;
    checkArgCR(crx); // take const ref
}
- const를 때어버려도 checkArgCR 내부에서 외부에서 정의된 상수를 수정할 수 없다.
- 매개변수에 const를 붙여주어 가시적으로 상수임을 알리는 것이 좋다.
auto의 특별한 자료형 추론
auto가 자료형 한정자 const를 자동으로 추론해주는 경우
- 예외적으로 auto가 const를 자동으로 붙여줄 때가 있다. 아래의 const int를 참조자로 사용하려면 반드시 const 자료형 한정자를 붙여주어야 한다. 이 때 auto는 const를 더 해주고 있다.
const int c_i = 0;
auto &auto_c_i = c_i;
- 아래 포인터는 값을 변경할 수 없다. 이러한 경우 auto keyword도 const를 더해준다.
int x = 10;
const int *ptr = &x;
auto a_ptr = ptr;
auto keyword와 두 개의 Ampersand를 사용한 경우
- auto keyword와 두개의 &를 사용하여 초기화해보자.
- 변수를 할당하면 L-value reference가 된다. 임시 값을 할당하면 R-value reference가 된다.
int i = 10;
auto && l_ref = i;
auto && r_ref = 10;

auto& l_ref2 = i;
//auto& r_ref2 = 10; // Error!
decltype
(1) 서로 다른 자료형을 계산하면 어떤 자료형으로 저장해야 할 지 알 수 없다. 템플릿을 사용하는 함수에서 이 같은 상황을 해결하기 위하여 decltype을 활용할 수 있다.
template<typename Left, typename Right>
auto mul_difftype(Left l, Right r) -> decltype(l*r)
{
    return l * r; // data type decided by two parm's type
}
(2) decltype은 expression을 계산하지 않는다. 어떤 자료형을 사용할지만 확인한다.
template<typename Left, typename Right>
auto mul_difftype(Left l, Right r) {
    typedef decltype(l * r) multipied_type; // l * r not calculated
    multipied_type result2 = l * r;         // just predict type
    return result2;
}
따라서 아래와 같은 형태로도 사용할 수 있다. 코드는 실행되지 않기 때문에 에러는 없다.
vector<int> empty_V;
typedef decltype(empty_V[10]) test; // int ref
(3) decltype은 익명으로도 사용할 수 있다.
template<typename Left, typename Right>
auto mul_difftype(Left l, Right r) {
    typedef decltype(l* r) result3 = l * r;
    return result3;
}
auto vs decltype
auto keyword
- 아래 예제에서 b와 c는 const int가 아니라 int 이다. 해당 값을 복사하여 사용하기 때문에 const일 필요가 없다.
int x;
const int c_x = 10;
const int& c_r_x = x;
auto a = x;          // int
auto b = c_x;        // int
auto c = c_r_x;      // int
decltype keyword
- auto와 다르게 const와 reference를 모두 저장해준다.
- 이중 괄호를 사용하게 되면 해당 자료형에 reference를 더해준다. 이미 reference가 더해진 자료형은 변하지 않는다.
typedef decltype(x)     x_type;   // int
typedef decltype(c_x)   cx_type;  // const int
typedef decltype(c_r_x) crx_type; // const int&

/* double parentheses add reference */
typedef decltype((x))     x_with_parens_type;   // int&
typedef decltype((c_x))   cx_with_parens_type;  // const int&
typedef decltype((c_r_x)) crx_with_parens_type; // const int & // same!
struct(구조체)에 auto와 decltype 사용해보기
- 구조체 포인터를 보자 const로 선언되어 해당 구조체에 접근하여 값을 변화시킬 수 없다. 따라서 auto keyword를 사용하여도 const가 붙어있어야 해당 구조체에 접근하여 값을 변경할 수 없다.
- const로 선언된 구조체 포인터에서 멤버변수에 접근하였다. 해당 값을 decltype으로 정의하자 const int가 아닌 int가 나왔다. decltype은 해당 변수가 선언되었을 때 자료형을 똑같이 불러온다.
- decltype과 이중 괄호를 사용하면 reference가 된다. 해당 값에 접근이 불가능하게 설정되어 있다면 const를 붙인다.
struct S {
    int m_x;
    S() { m_x = 1; }
};

const S *s_ptr = new S();

auto d = s_ptr;      // const S*
auto e = s_ptr->m_x; // int
                                         // s_ptr is const but
typedef decltype(s_ptr->m_x)   m_x_type; // int, get declared type.
typedef decltype((s_ptr->m_x)) m_x_with_type; // const int&, because not copy
변수 e는 복사본이기에 수정이 가능하다.
함수 반환값을 저장할 자료형에 auto와 decltype을 사용해보자
- 위와 동일하다. auto는 const와 ampersand를 빼고 decltype은 유지한다.
const S returnS() {
    return S();
}
const int& returnInt() {
    return 111;
}

int main() {
    auto a = returnS(); // S, detach const.
    typedef decltype(returnS) testType1; // const S

    auto b = returnInt(); // int, detach const.
    typedef decltype(returnInt) testType2; // const int&
}
STL에 auto와 decltype을 사용해보자
- vector의 오버로딩 연산자 [ ] 는 reference를 반환한다. auto는 int로 변환하지만 decltype은 int&로 변환한다.
vector<int> v = {1,2};

auto c = v[0]; // int
decltype(v[0]) testType3 = v[0]; // int&, vector's [] operator return ref
연산 결과에 auto 와 decltype을 사용해보자
- decltype을 보자. 두 변수가 const로 지정되었더라도 expression 결과는 r-value이기에 int이다.
const int c_x = 10;
const int c_y = 11;

auto a = c_x * c_y; // int
typedef decltype(c_x * c_y) test_type1; // int, expression is r-value
- 두 변수가 다른 자료형일 때 더 큰 자료형으로 promotion 되었다
int x = 1;
double d1 = 3.14;
double d2 = 2.5;

auto c = x < d2 ? x : d2; // double, promotion
typedef decltype(x < d2 ? x : d2) test_type3; // double, promotion
trenary operator의 문제점
주의!! trenary operator를 사용할 때 세 값이 모두 동일한 자료형이면 해당 자료형의 &를 반환한다
auto b = d1<d2? d1:d2; // double
typedef decltype(d1<d2? d1:d2) test_type2; // double& // Care!!!
typedef decltype(d1) test_type2_1; // double
- 아래 템플릿 함수는 trenary operator를 사용하여 값을 반환하고 있다. 이 때 매개변수의 자료형에 따라 반환값이 달라지는 건 당연하다. 그런데 동일한 자료형을 매개변수로 사용하면 반환값에 Ampersand가 붙어 반환된다!
template<typename Left, typename Right>
auto diversetype_min_X(Left l, Right r) -> decltype (l < r ? l : r) {
    return l < r ? l : r;
}

int main() {
    int i = 10;
    double d = 10.1;

    auto a = min(static_cast<double>(i), d); // so uncomfortable...

    typedef decltype(diversetype_min_X(d,d)) test1;  // double&
    typedef decltype(diversetype_min_X(i, d)) test2; // double
}
반환값에 remove_reference를 사용하였다. 만약 reference가 붙어있다면 이를 제거한다.
template<typename Left, typename Right>
auto diversetype_min_O(Left l, Right r) ->
    typename std::remove_reference<decltype(l < r ? l : r)>::type {
    return l < r ? l : r;
}
클래스 내부에 선언된 typedef 접근하기
- 클래스 내부에서 선언된 type에 접근할 수 있다. decltype으로 인스턴스의 자료형을 얻어낸 뒤 해당 typedef를 불러오자
template<typename templ_param>
class test {
public:
    typedef templ_param result_t;

    test(){}

    result_t operator(){
        return  templ_param();
    }
};

int main() {
    test<int> doTest;
    typedef decltype(doTest)::result_t what_type; // int, nested type
}
lambda 자료형에 auto와 decltype 사용하기
- lambda의 자료형은 function point이다.
- decltype으로 lambda 자료형을 가져와 사용하면 해당 lambda를 복사하거나 참조자를 만든다.
auto lambda = [](){ return 10; };
// ^ auto = class lambda[]int()->int

decltype(lambda) copied(lambda); // get lambda's type and call copy constructor
decltype((lambda)) referenced(lambda); // get lambda's type and make ref

cout << &lambda << " " << &copied << endl;   // 008FFE9B 008FFE8F
cout << &lambda << " " << &referenced<< endl;// 008FFE9B 008FFE9B
auto를 사용하여 generic lambda 만들기
- 함수의 parameter에서 auto keyword를 사용할 수 없다. lambda는 가능하다.
- auto keyword를 사용하여 어느 자료형에나 사용할 수 있는 generic lambda를 만들 수 있다.
auto lambda = [](auto x, auto y) {
    return x+y;
};

cout << lambda(1.1, 2.2) << endl;
cout << lambda(1, 2.2) << endl;
cout << lambda(1.1, 2) << endl;
'Programming Language > C++' 카테고리의 다른 글
| [코테용C++ 핵심정리] 챕터1. 작동원리 (0) | 2023.11.16 |
|---|---|
| [홍정모의 따라하며 배우는 C++] 20. 중급 프로그래머들의 상식 (0) | 2022.01.07 |
| [홍정모의 따라하며 배우는 C++] 18. 입력과 출력 (0) | 2022.01.05 |
| [홍정모의 따라하며 배우는 C++] 17. std::string 문자열 클래스 (0) | 2022.01.02 |
| [홍정모의 따라하며 배우는 C++] 16. 표준 템플릿 라이브러리 (0) | 2022.01.01 |

