배움 저장소
[홍정모의 따라하며 배우는 C++] 20. 중급 프로그래머들의 상식 본문
20.1 비쥬얼 스튜디오로 프로파일링 하기
참고자료 https://docs.microsoft.com/en-us/visualstudio/profiling/?view=vs-2019
Measure performance in Visual Studio - Visual Studio (Windows)
Learn how to use Visual Studio to measure performance using profiling tools.
docs.microsoft.com
CPU와 Heap memory를 profiling 해보자
- 정밀한 프로그램을 만드는 경우 CPU와 Memory를 동시에 profiling하면 정확도가 떨어질 수 있다. 하나씩 하자
- Debug 모드로 실행하여 Diagnostic tool을 이용하자
- 프로그램이 완성되면 Release 모드로 profiling 해보자. Debug 모드가 더 자세한 정보를 나타내주기 때문에 프로그램이 완성되었을 때 성능을 테스트하기 위한 용도로 사용함이 적절하다.
CPU Usage Profiling
- 아래 코드를 Debug하여 CPU Usage를 확인하자.
- main 함수 내부 work_util( ) 전 후에 break point를 생성하자.
void util_profiling1() {
    unsigned long long sum=0;
    for (unsigned i = 0; i < 1000'000; ++i)
        sum += i;
    cout << sum << endl;
}

void util_profiling2() {
    unsigned long long sum = 0;
    for (unsigned i = 0; i < 1000'000'000; ++i)
        sum += i;
    cout << sum << endl;
}

void work_util() {
    util_profiling1();
    util_profiling2();
}

int main() {
    work_util();
}
(1) Diagnostic Tools에서 Record CPU Profile을 활성화하자

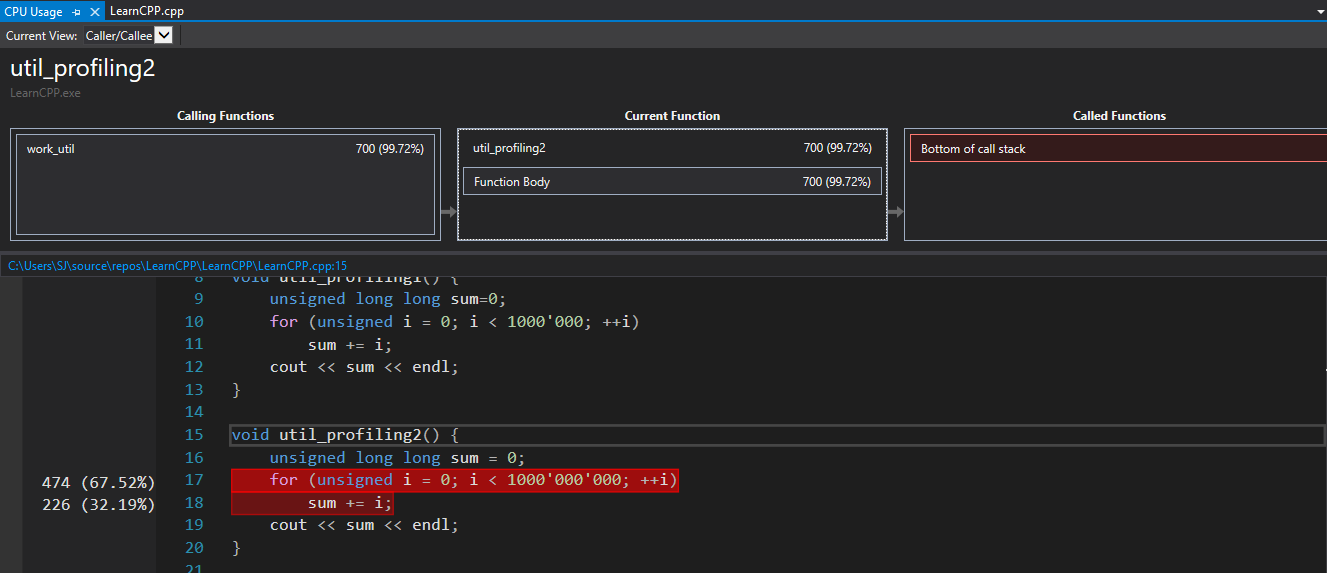
(2) Caller/Callee에서 main 함수를 찾아가자. 아래에서 99.70은 전체 CPU 사용량 중 해당 함수의 비중을 뜻한다.

(3) CPU 사용량이 높은 코드로 가서 최적화 작업을 진행해주자. 이 예제는 최적화 할 작업이 없지만 algorithm을 사용한 경우 더 좋은 algorithm을 적용해볼 수 있다.

Heap memory Usage Profiling
다음 코드에서 Heap memory profiling을 해보자 debug모드로 실행해야 한다. 각 코드마다 break point를 만들자.
int* d = new int[10000];
float* f = new float[100];

delete[] d;
delete[] f;
(1) heap profiling을 활성화하자

(2) Take Snapshot를 클릭하자. Heap memory의 사용량 변화를 표시한다. 파란색으로 표시된 글자를 클릭하면 더 자세한 정보를 표시한다.

위 코드에서 int 자료형 40000개와 float 자료형 100개를 동적할당 받았다. Size를 확인하면 이와 일치함을 볼 수 있다.
Release Mode에서 profiling하기
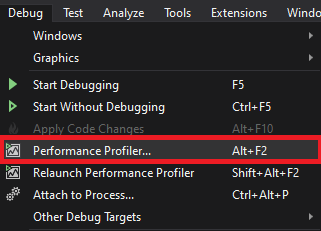
- Debug 모드에서는 Debugging에 필요한 정보를 모으고 있어 Release 모드와 속도차이가 난다. 실제 프로그램을 사용할 때를 가정하여 profiling 해보자. 아래 그림처럼 Debug -> Performance Profiler를 사용해주면 된다
- 코드는 19.6 멀티쓰레딩 예제 (벡터 내적) - [홍정모의 따라하며 배우는 C++] 19. 모던 C++ 필수 요소들을 사용하였다
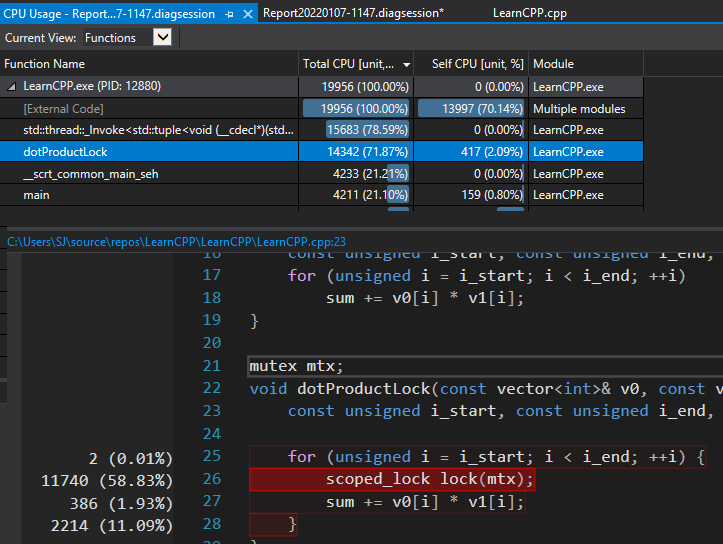
(1) Performance Profiler를 실행후 CPU Usage를 확인해보자. 함수 dotProductLock가 전체 사용량의 71%를 사용하였다.

(2) 클릭해서 보면 더 자세한 정보를 확인할 수 있다. 해당 코드를 최적화하면 된다.
20.2 깃, 깃헙 시작하기 Git, Github
Github User 관리하기
- user 설정을 위해 아래와 같은 command를 입력해주면 된다.
git config --global user.name "user name"이 때 다른 컴퓨터에서 user 정보가 이미 등록되어있을 경우 Credential Manager에서 해당 user 정보를 삭제하고 다시 등록해주자

20.3 비쥬얼 스튜디오에서 깃헙 사용하기
20.4 Vcpkg 설치 방법
외부 라이브러리 관리
파이썬 Package installer인 pip의 Visual Studio 버전이다.
https://github.com/microsoft/vcpkg
GitHub - microsoft/vcpkg: C++ Library Manager for Windows, Linux, and MacOS
C++ Library Manager for Windows, Linux, and MacOS. Contribute to microsoft/vcpkg development by creating an account on GitHub.
github.com
20.5 TCP IP 네트워킹 맛보기 - Boost.Asio Socket IOStream
Server
#include <iostream>
#include <utility>
#include <boost/asio.hpp>
#include <string>

using boost::asio::ip::tcp;

int main(int argc, char* argv[])
{
    try
    {
        boost::asio::io_service io_service;

        //tcp::endpoint endpoint(tcp::v4(), /*Port Nums*/ 13);
        tcp::endpoint endpoint(tcp::v4(), /*Port Nums*/ 9999);
        tcp::acceptor acceptor(io_service, endpoint); // endpoint is connecting to acceptor

        std::cout << "Server started" << std::endl;

        for (;;) // infinite loop
        {
            const std::string message_to_send = "Hello From Server";
            boost::asio::ip::tcp::iostream stream;

            std::cout << "check 1" << std::endl;

            boost::system::error_code ec;


            // Wait untill client connect to this
            // in this code if client connect, read buffers.
            acceptor.accept(*stream.rdbuf()/* stream read buffer */, ec);

            std::cout << "check 2" << std::endl;

            if (!ec) // Success on connection, no error code
            {
                // receive message from client
                std::string line;
                std::getline(stream/* from above, stream already read it from buffer */, line);
                std::cout << line << std::endl;

                // send message to client
                stream << message_to_send;
                stream << std::endl; // for client side, member function "getline" needs it.
            }
        }
    }
    catch (std::exception& e)
    {
        std::cerr << "Exception: " << e.what() << "\n";
    }

    return 0;
}
Client
#include <iostream>
#include <string>
#include <boost/asio.hpp>

// https://www.boost.org/doc/libs/1_68_0/doc/html/boost_asio/examples/cpp11_examples.html

using boost::asio::ip::tcp;


// Take Server address as a Parameter
int main(int argc, char* argv[])
{

	try
	{
		// if Arguments count is less than 2
		//if (argc < 2)
		//{
		//	std::cerr << "Usage : Client <Host> " << std::endl;
		//	return 1;
		//}

		//tcp::iostream stream(argv[1], std::to_string(/*Port num*/ int(9999)));
		tcp::iostream stream("127.0.0.1", std::to_string(/*Port num*/ int(9999)));

		if (!stream)
		{
			std::cout << "Unable to Connect: " << stream.error().message() << std::endl;
			return 1;
		}

		// send message to server
		stream << "Hello from Client";
		stream << std::endl; // send new-line to end receiver's stream getline

		// receive message from server
		std::string line;
		std::getline(stream, line);
		std::cout << line << std::endl;
	}

	catch (std::exception& e)
	{
		std::cout << "Exception: " << e.what() << std::endl;
	}

	return 0;
}
20.6 외부 라이브러리 설치, 프로젝트 템플릿
라이브러리 설치
(1) where is the source code : Git clone 위치를 입력한다.
(2) where to build the binaries : " {Git clone 위치}/build " 를 입력해주자
! ! 이때 CMakeLists.txt 파일이 존재해야 한다. (Visual Studio Solution파일만 있다면 CMake를 사용하지 않아도 됨)
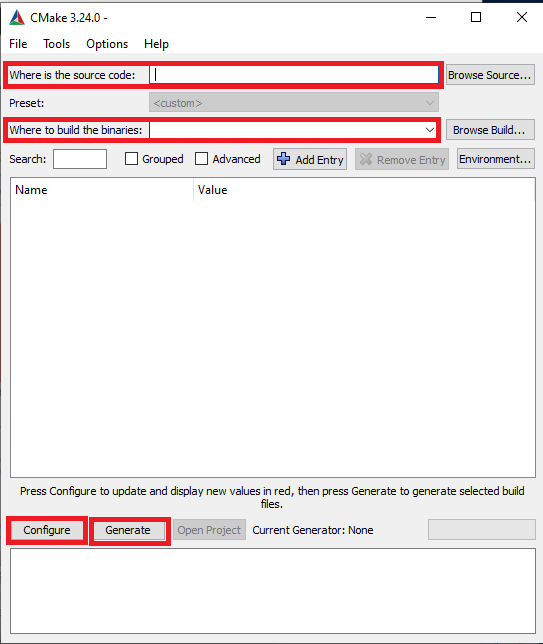
(3) 이후 Configure -> Generate를 클릭하면 Build 폴더에 Solution File(.sln)이 생성된다.
(4) Solution File에서 Build
(5) Release or Debug 폴더에서 exe파일을 확인하자.
새로 만든 Project에서 Build 하기
- Dependency 설정이 필요하다.
(1) Github Source에서 제공하는 예제 프로젝트를 열자.
(2) 예제 프로젝트의 설정을 맞춰줘야 한다.
Properties -> Configuration Properties
| C/C++ | General => Additional Include Directories |
| Preprocessor => Preprocessor Definitions | |
| Linker | Input => Additional Dependencies (Semi colon으로 구분) |
| General => Additional Library Directories (Additional Dependencies가 들어있는 폴더 설정) |
특정 dll 파일이 존재하지 않을 경우
(1) build된 예제 프로젝트에 가서 dll 파일을 가져와 작업하자.
- 이 때 Debug 와 Release 모드는 같은 이름의 dll 파일이라도 다른 내용을 가지고 있기 때문에 Release / Debug 폴더에 dll 파일을 저장함이 적절하다.
(2) Dll 파일의 위치를 알려주자

설정값 저장하기(Template 만들기)
(1) 저장

(2) 불러오기
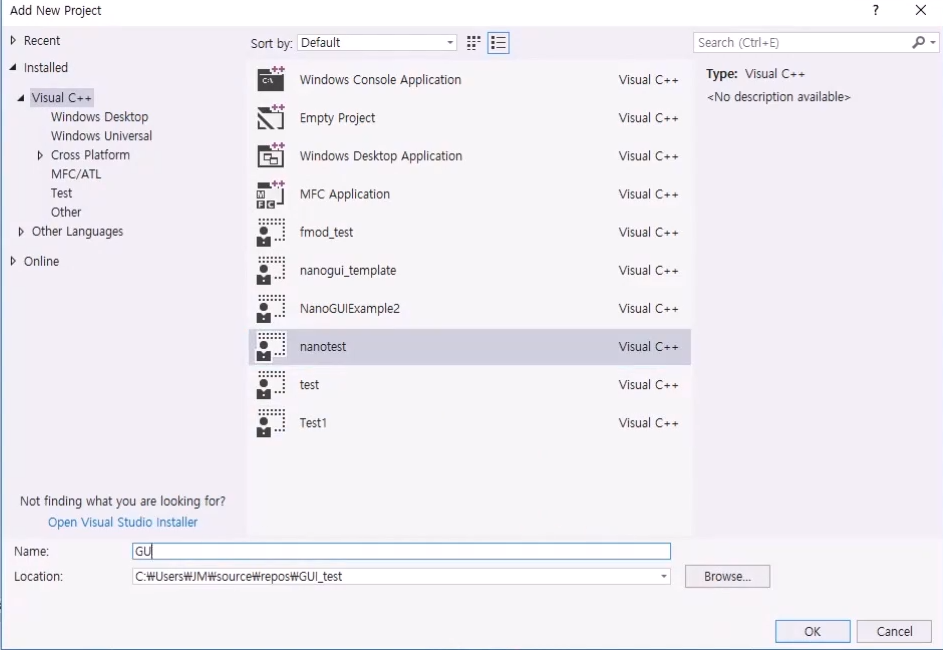
Runtime Library
- 외부 Library의 Runtime Library 설정과 내가 만든 Project의 Runtime Library가 다르면 에러가 발생할 수 있다.

'Programming Language > C++' 카테고리의 다른 글
| [코테용C++핵심정리] 챔터2. 기본 개념들 (0) | 2023.11.16 |
|---|---|
| [코테용C++ 핵심정리] 챕터1. 작동원리 (0) | 2023.11.16 |
| [홍정모의 따라하며 배우는 C++] 19. 모던 C++ 필수 요소들 (0) | 2022.01.06 |
| [홍정모의 따라하며 배우는 C++] 18. 입력과 출력 (0) | 2022.01.05 |
| [홍정모의 따라하며 배우는 C++] 17. std::string 문자열 클래스 (0) | 2022.01.02 |


